

Lisbon and I have been busy in our free time making sleeping mats from plastic grocery bags for a charity that distributes them to the homeless. Being home from school for months and with plenty of time on her hands, Lisbon became an expert at weaving these mats. Plus, we felt happy recycling plastic bags that would normally end up in the landfills while helping someone living in the street with an nearly indestructible mat.
When I mentioned in a newsletter and on social media what we were doing, others wanted to know how to make the mats. It was a bit of trial and errors learning on our ow, but we shot some videos to help. We ran into a little snag. It was Lisbon’s first time manning the camera, and most of the footage was dizzying! Lol. And she wasn’t the only one. What I filmed was also not that great! But that’s okay. We’ll include what we can here, and also link to other clips that helped us get started, along with written instructions.
Step 1: Make a Loom
First off, you need a loom. We made ours so the opening was 2.5 feet wide and 6 feet long (from peg to peg). I say we, but I really mean my husband! Some people online make them three feet wide, that that seemed too unwieldy to carry around. We bought the wood, the metal bar for the sides, and hooks and eyelets for less than twenty dollars at Home Depot. Note that metal bars for the sides of the loom normally only come in six feet, so we should have made our loom a few inches shorter, but because we made the loom first, we ended up using two shorter bars and connecting them in the middle. So you might consider making your loom a bit shorter so you don’t have to do that.
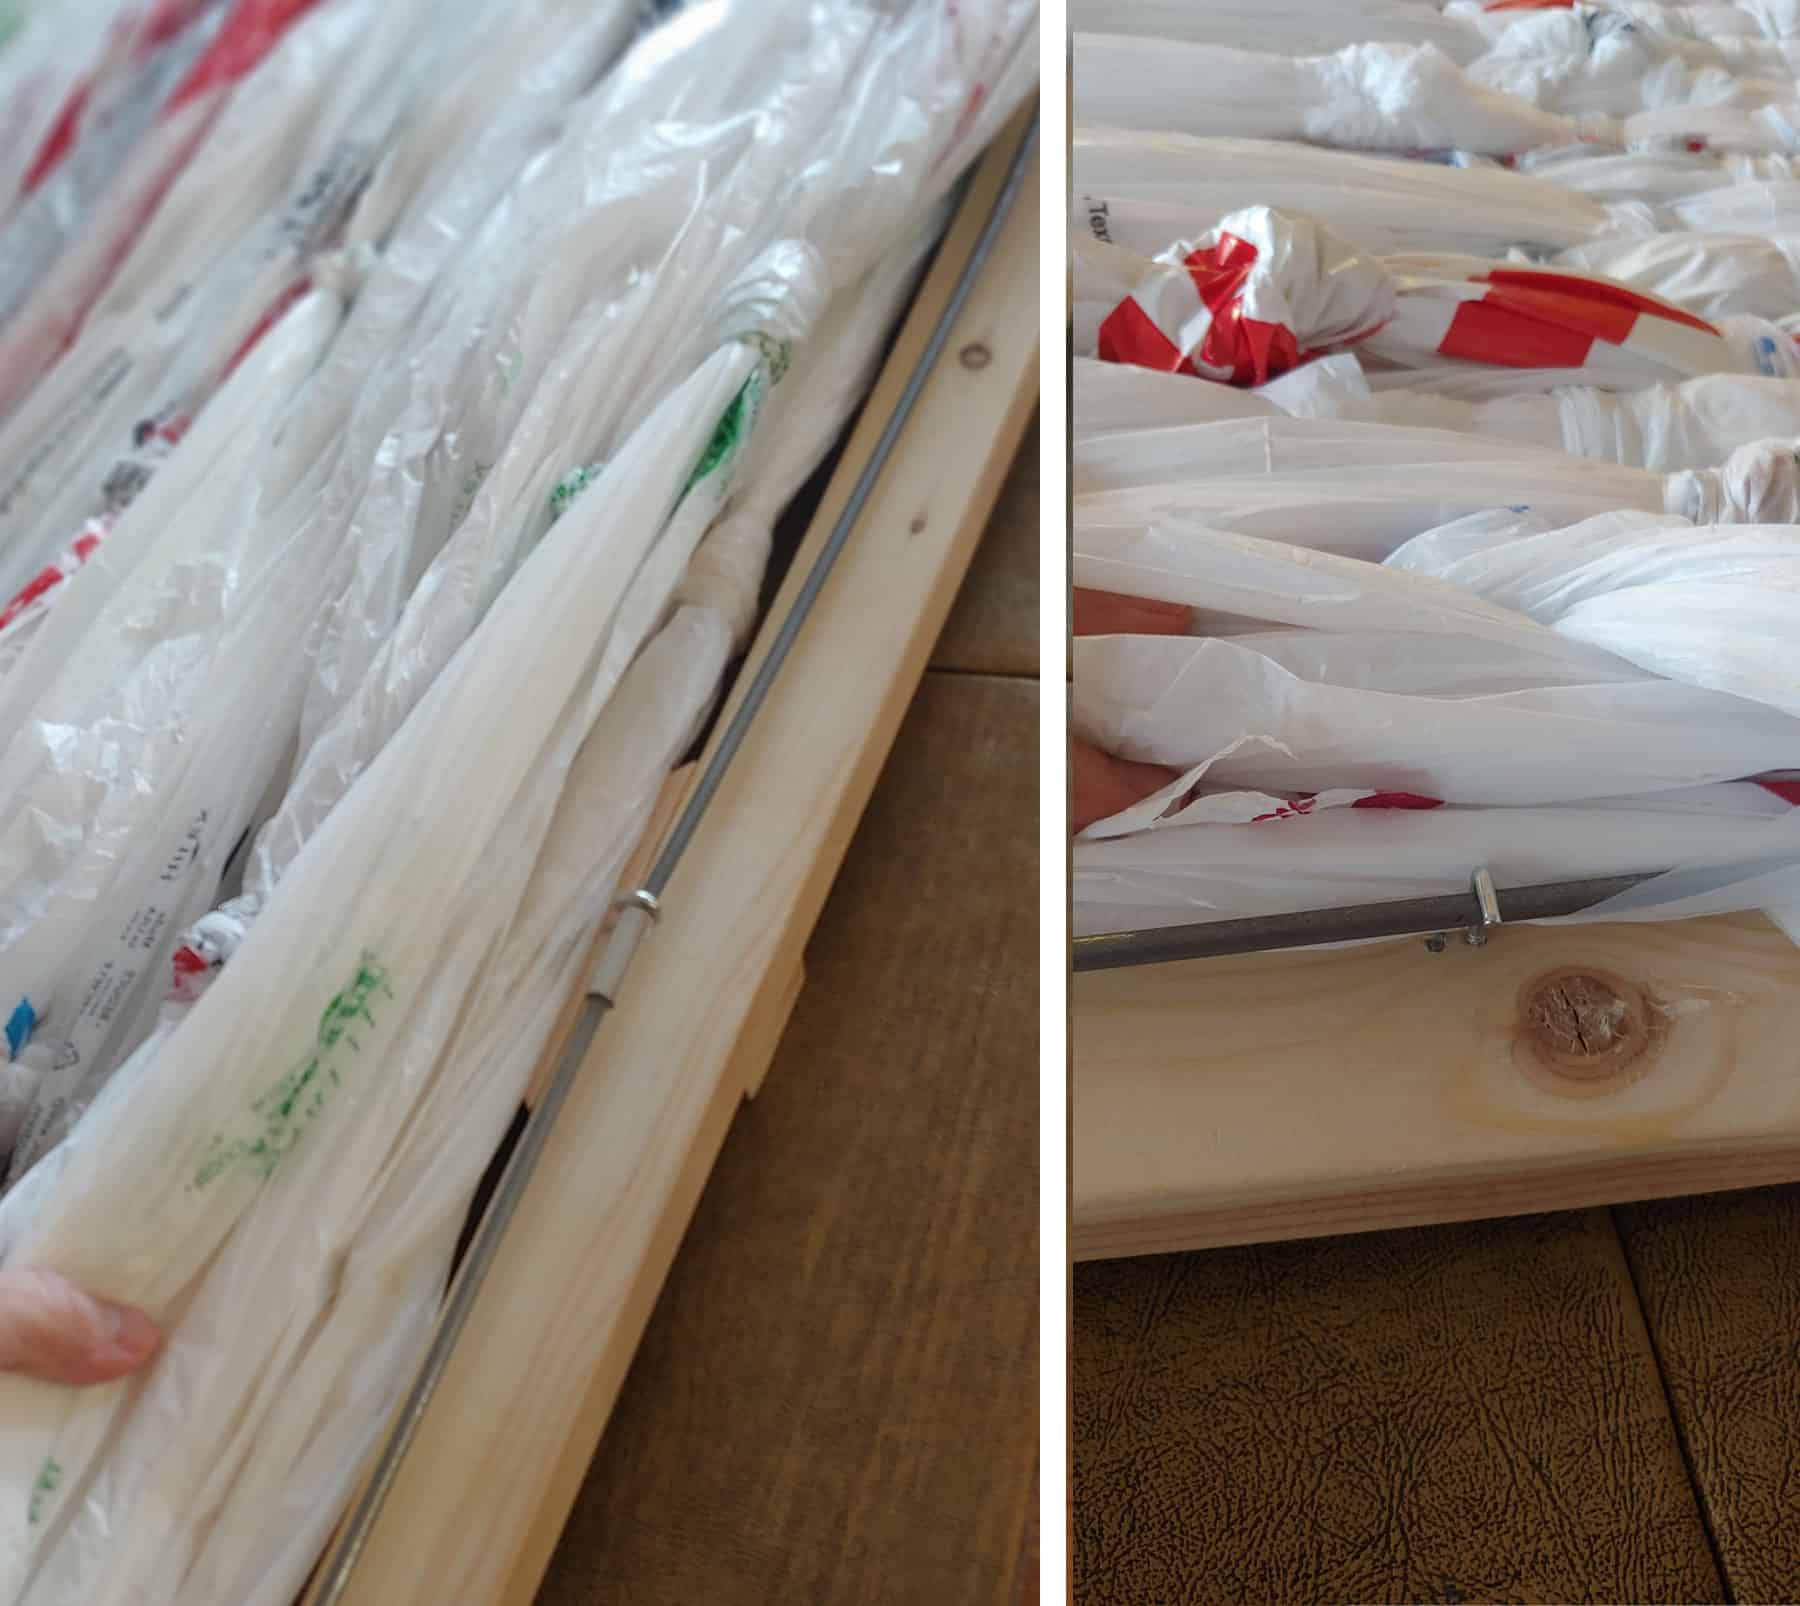
Below is the underside of the loom. You’ll see the pegs in the topside in the videos later on.
Step 2: Prepare the Bags
Depending on the size of your loom, you’ll need to cut about 400 bags to finish a mat. This is how you’ll cut them.
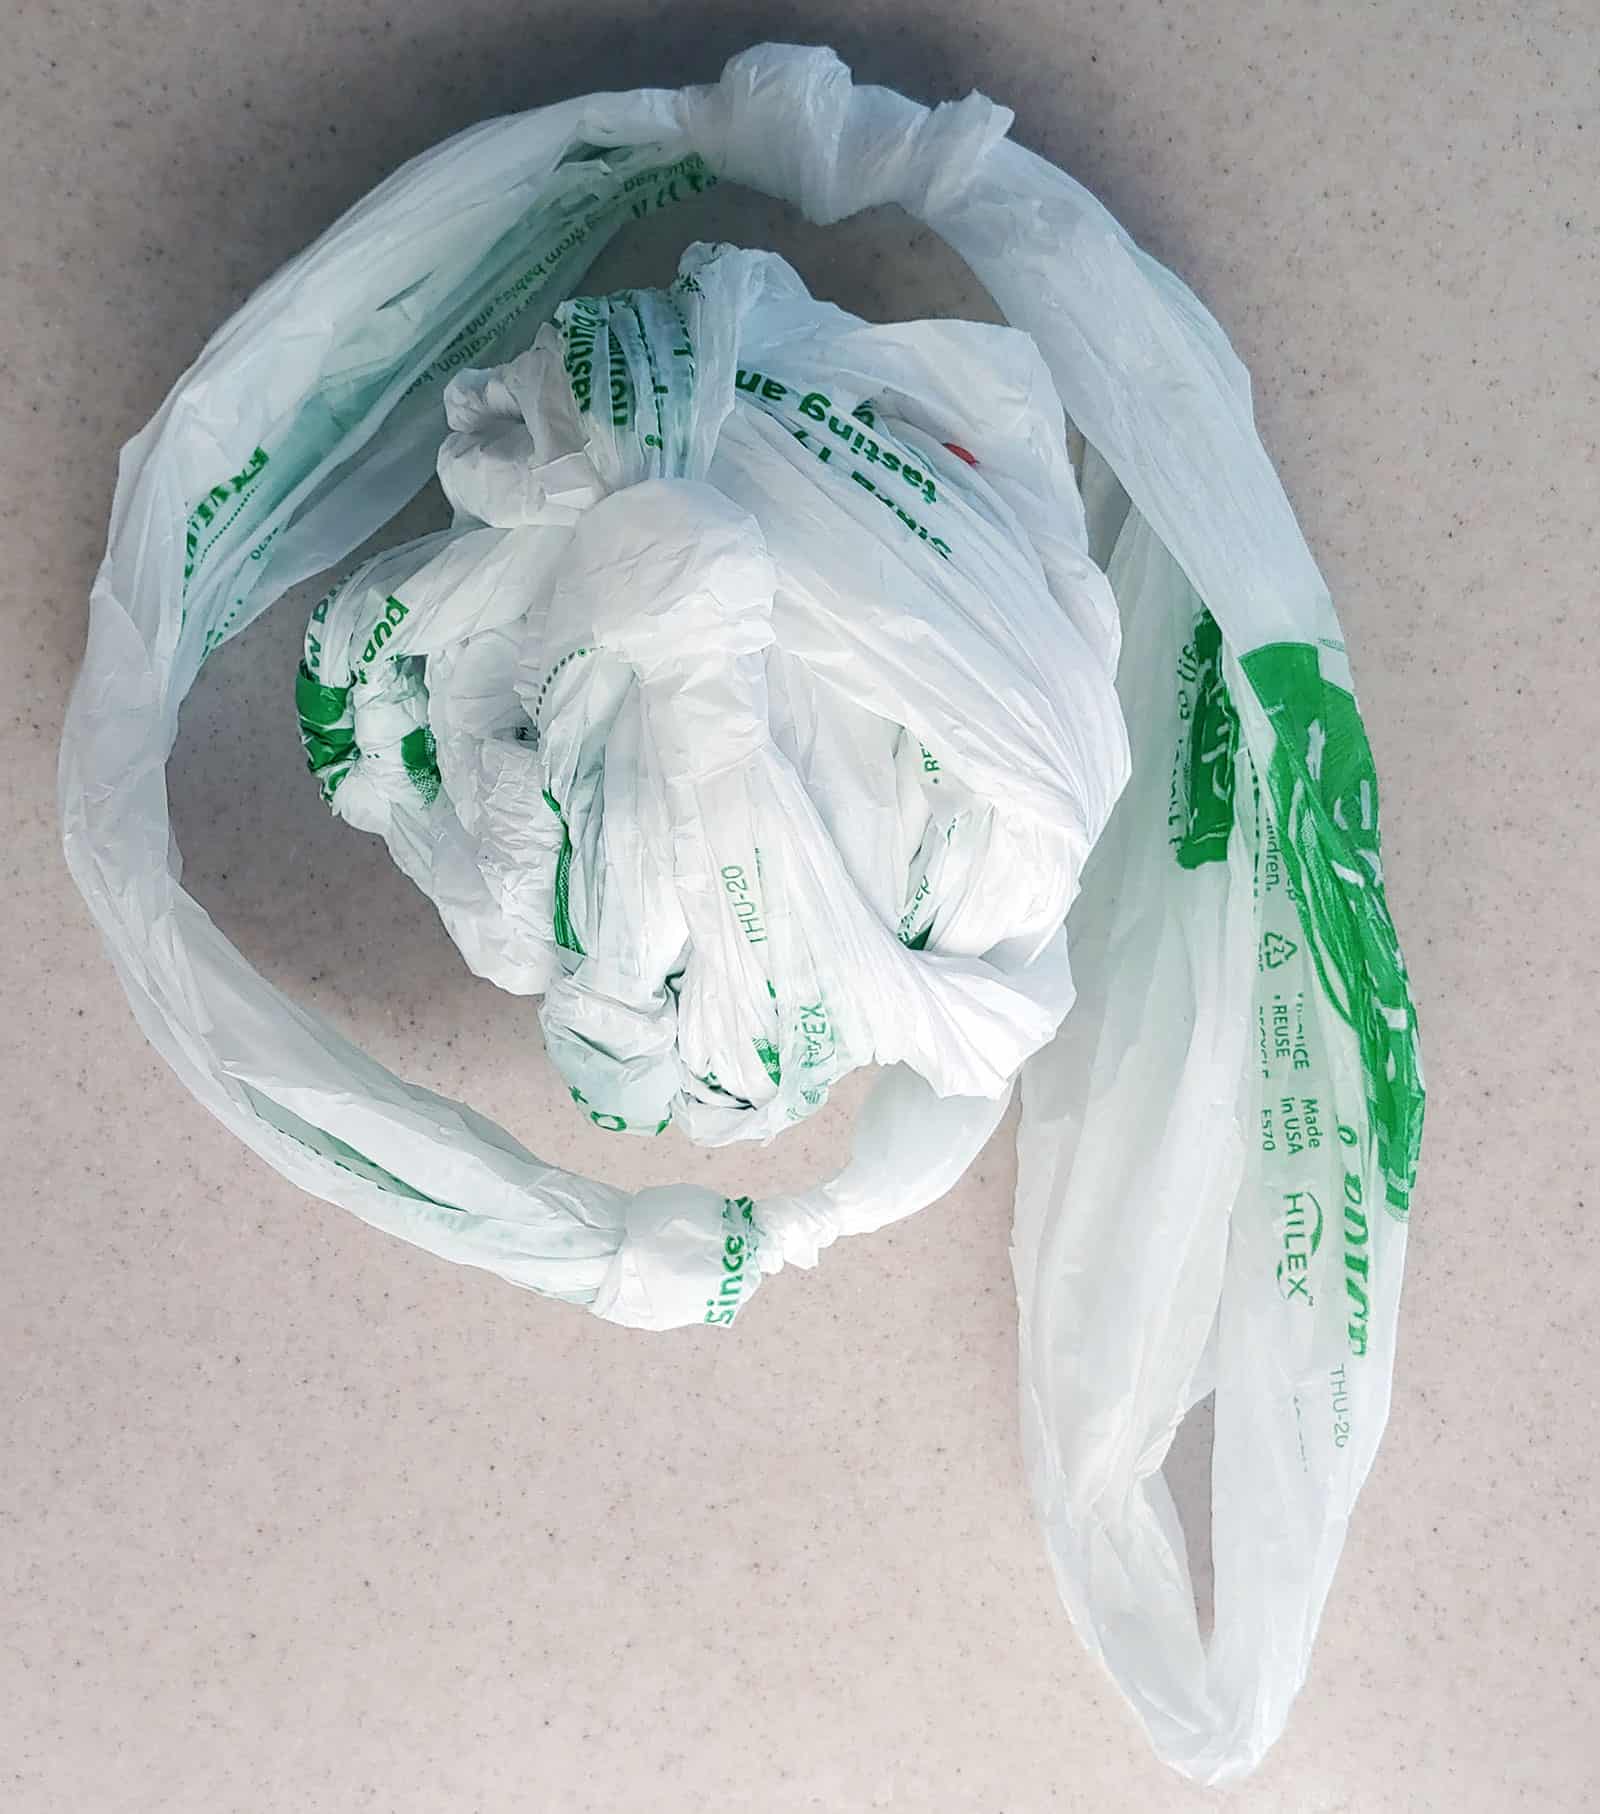
Plarn Balls
As you prepare some bags, join them together in a long chain (called plarn) and roll those into a ball. The balls should be able to fit through one of your prepared bags. You will need about four to five large “plarn” balls to “load the loom.” The ball below is only a fourth of the size that you’ll need.
Weaving Plarns (Sets of Two)
The rest of the balls you will prepare in sets of two. You will use these to weave the mat, adding more sets as you need them. You can use the colors to make patterns in your mat.
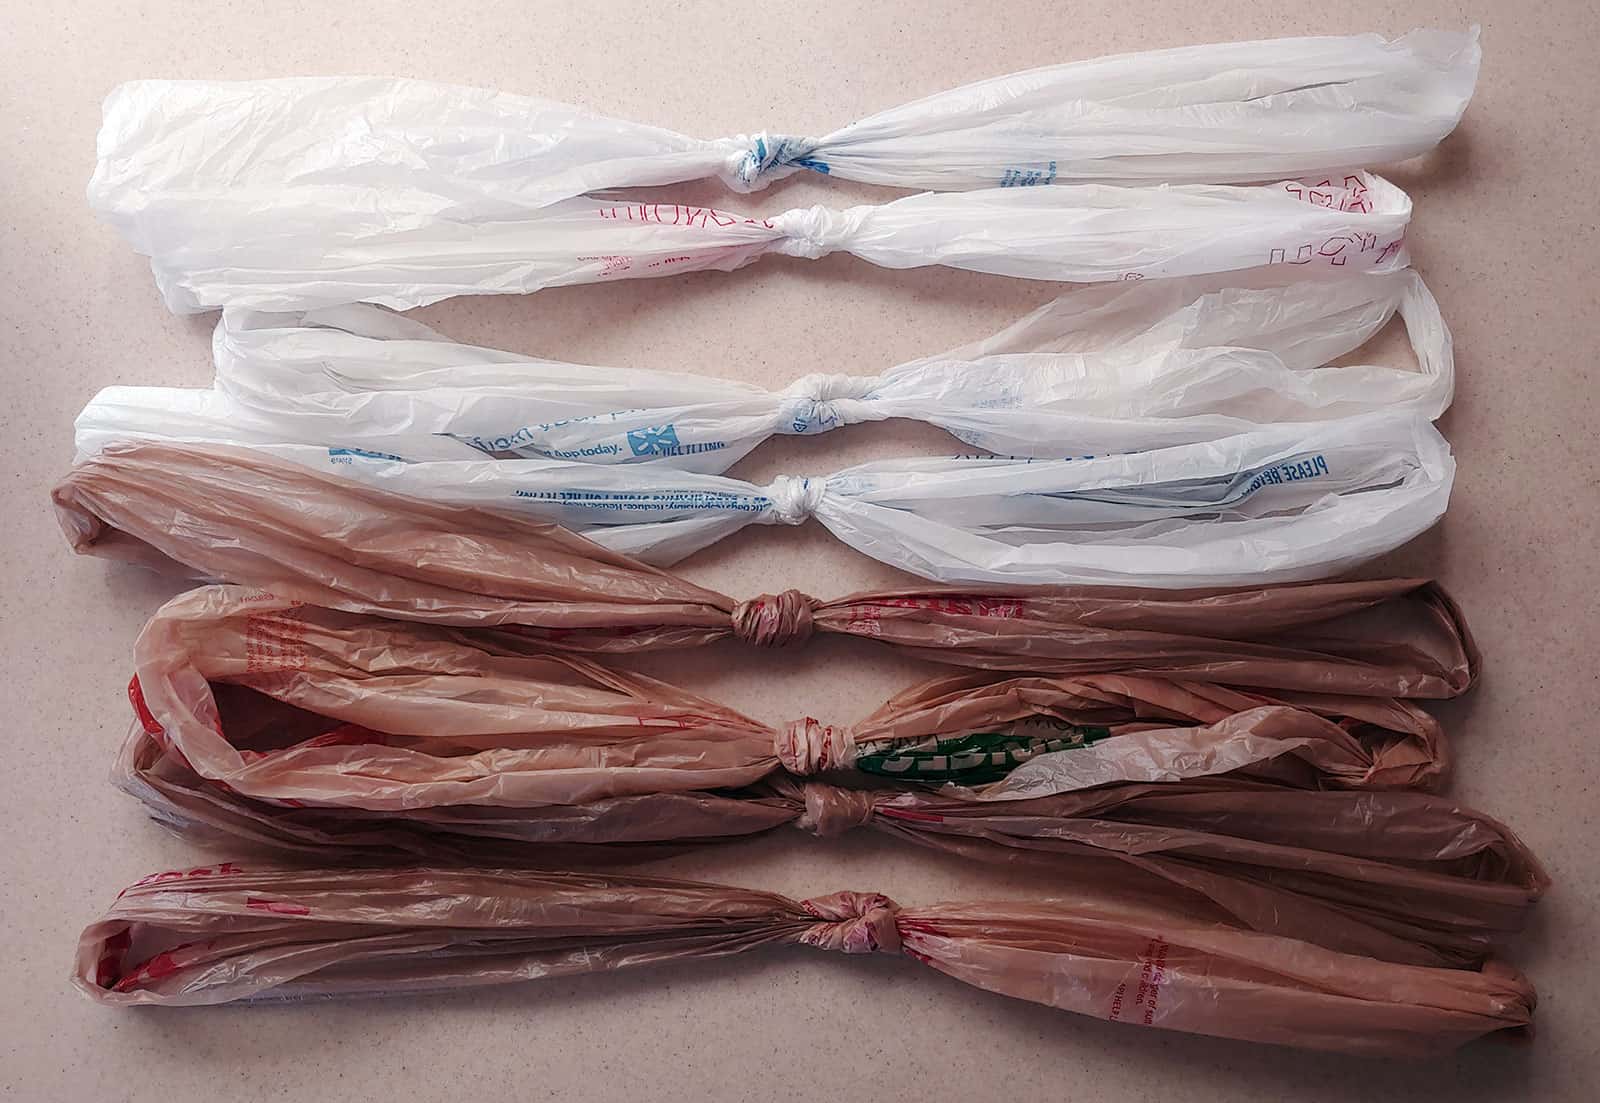
Sorting bags
Before you start cutting you might want to sort. We cut and sort as we go, and we have different piles for when we start weaving, but you might find this video from Stitching Hearts Worldwide helpful.
Step 3: Load the Loom
When we filmed this, it turned about to be one of our most dizzying videos, so we’re embedding the YouTube link to the Stitching Hearts Worldwide video we initially learned from instead. Note at the beginning that they are using the metal rod as a peg. We didn’t do that, but it might have made it easier because you have to put three layers on the ends. Our metal rod is just really close to our last peg, and it works fine. They are using Walmart bags for loading the loom, but we usually save those for the weaving because they’re thinner.
Don’t worry if you have a lot more of the bags left over after you tie off after loading the loom row. You’ll weave over it as you finish the mat. Sometimes I even use a bit of Shoe Goo to tack it down so it’s not flopping while we work.
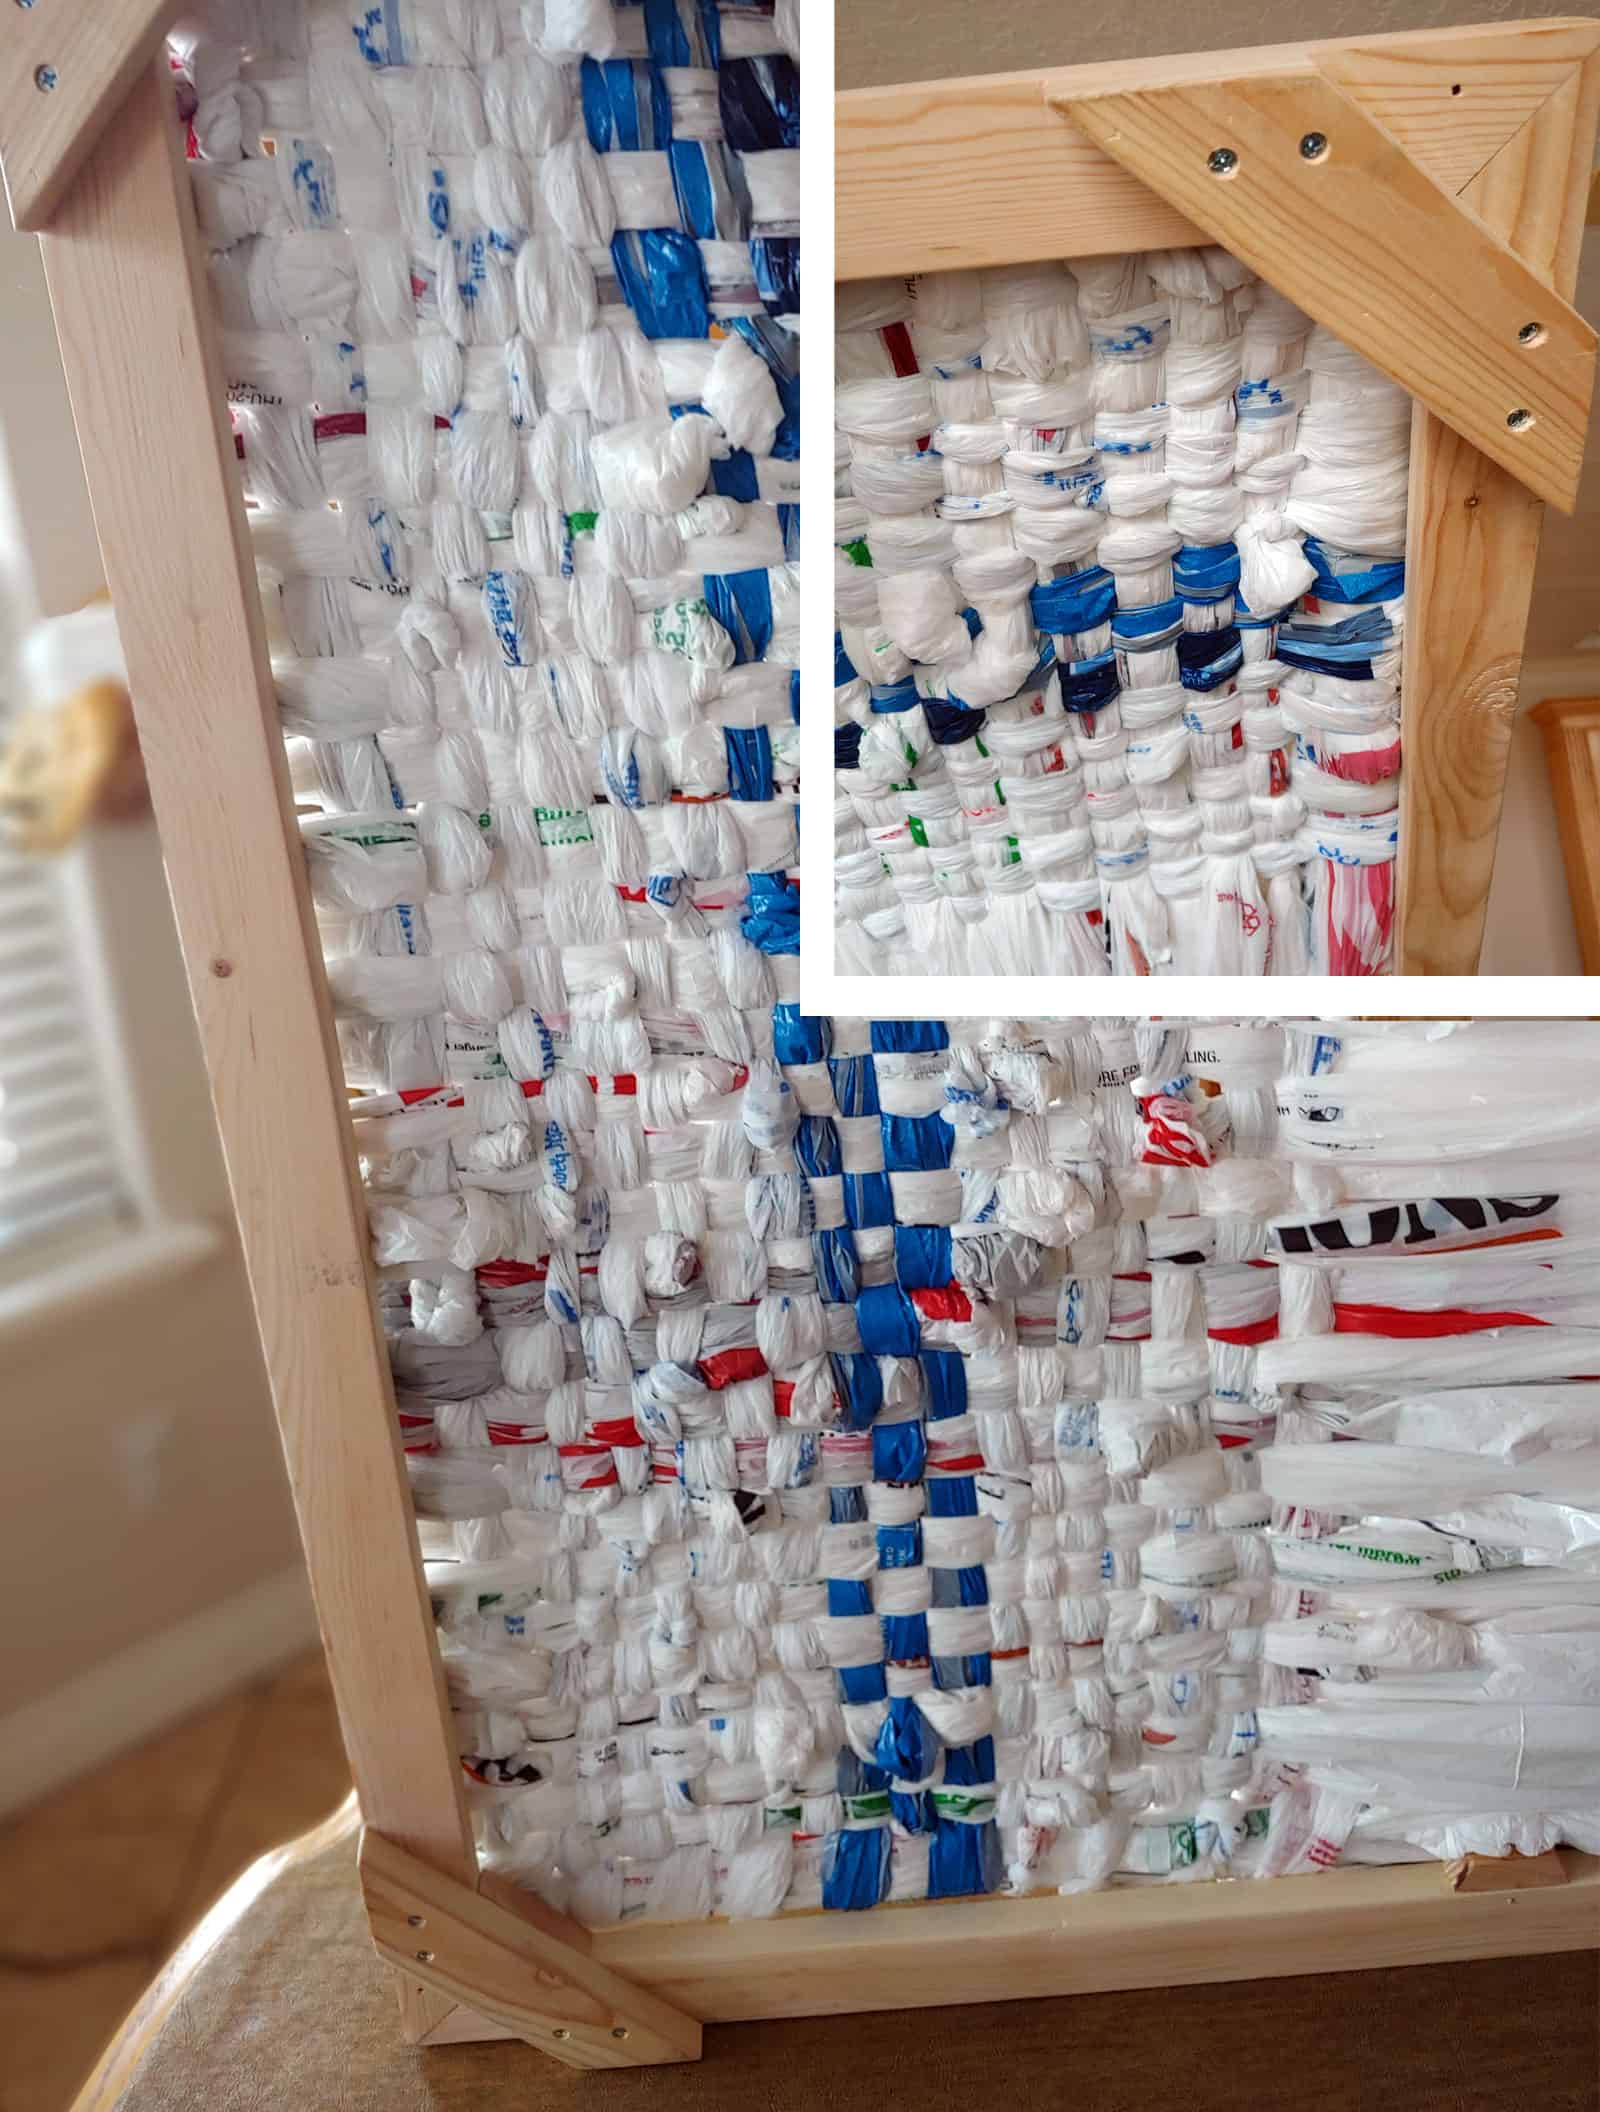
Step 4 and 5: Weave Mat and Braid the Ends
Then you start the weave. First look at the video from Stitching Hearts Worldwide, but then look at the ones we added because they’ll save you a lot of headaches. Also, make sure you are checking both sides of the mat every few rows (especially if kids are helping you) to make sure you haven’t messed up. you should be able to see if you dropped a stitch or did something else weird. If you make a mistake that you don’t realize until you’re finish with the mat, you can usually fix it with dab of Shoe Goo.
Lisbon Weaving
Start at Both Sides
One of the things we couldn’t find information for when we first started weaving plastic bag sleeping mats is that you NEED to start at both sides of the mat. Because what they don’t tell you, is that you MUST start from both ends and weave inward, but there is a little trick to it because the initial lines are not the same on both sides. It’s logical when you think about it, but we had to unweave almost half a mat before we realized!
Watch this to see what is different about each side.
Finishing the Middle
The middle you might find tricky, but basically, you’ll need to combined the two strands together. I like to do that at the end before I finish the last row, usually pulling one through another loop. Tie if you need to. To get the mat uniform, you might need to go back up on the same line of weave. Just experiment to see what looks good. Then you take a bit of Shoe Goo and glue the last bit. It’s always good to knot where it looks good, and then weave the rest of the back through and glue it. That way there is a double safety against unraveling.
Gluing
In one of the videos above, you can see how to finish the ends of the mat. After weaving the end bag through, I also like to glue the end for additional security before tucking it out of sight.
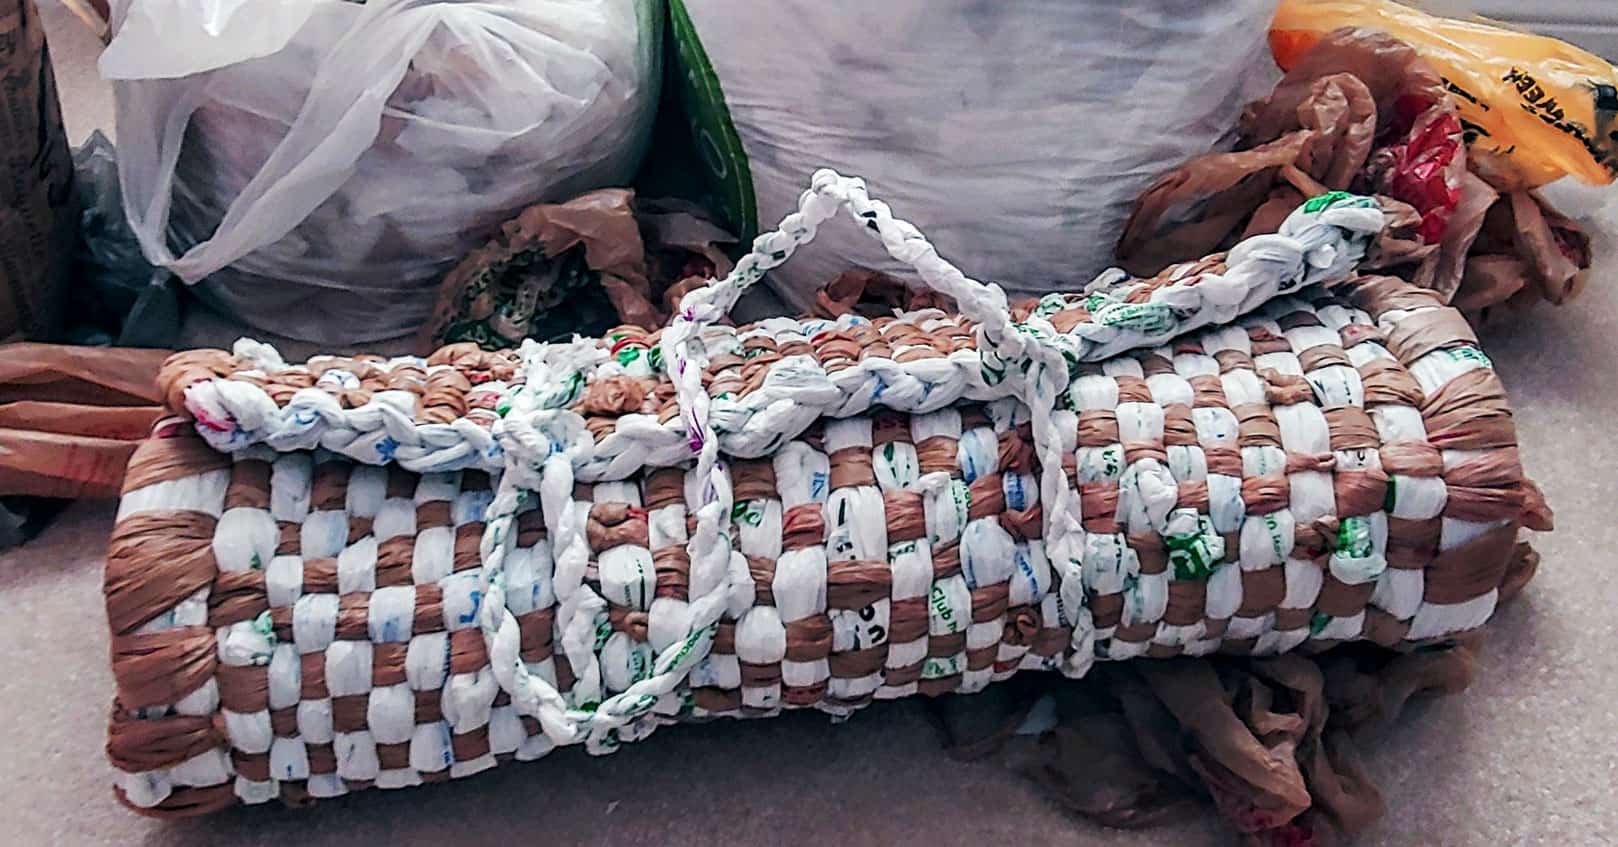
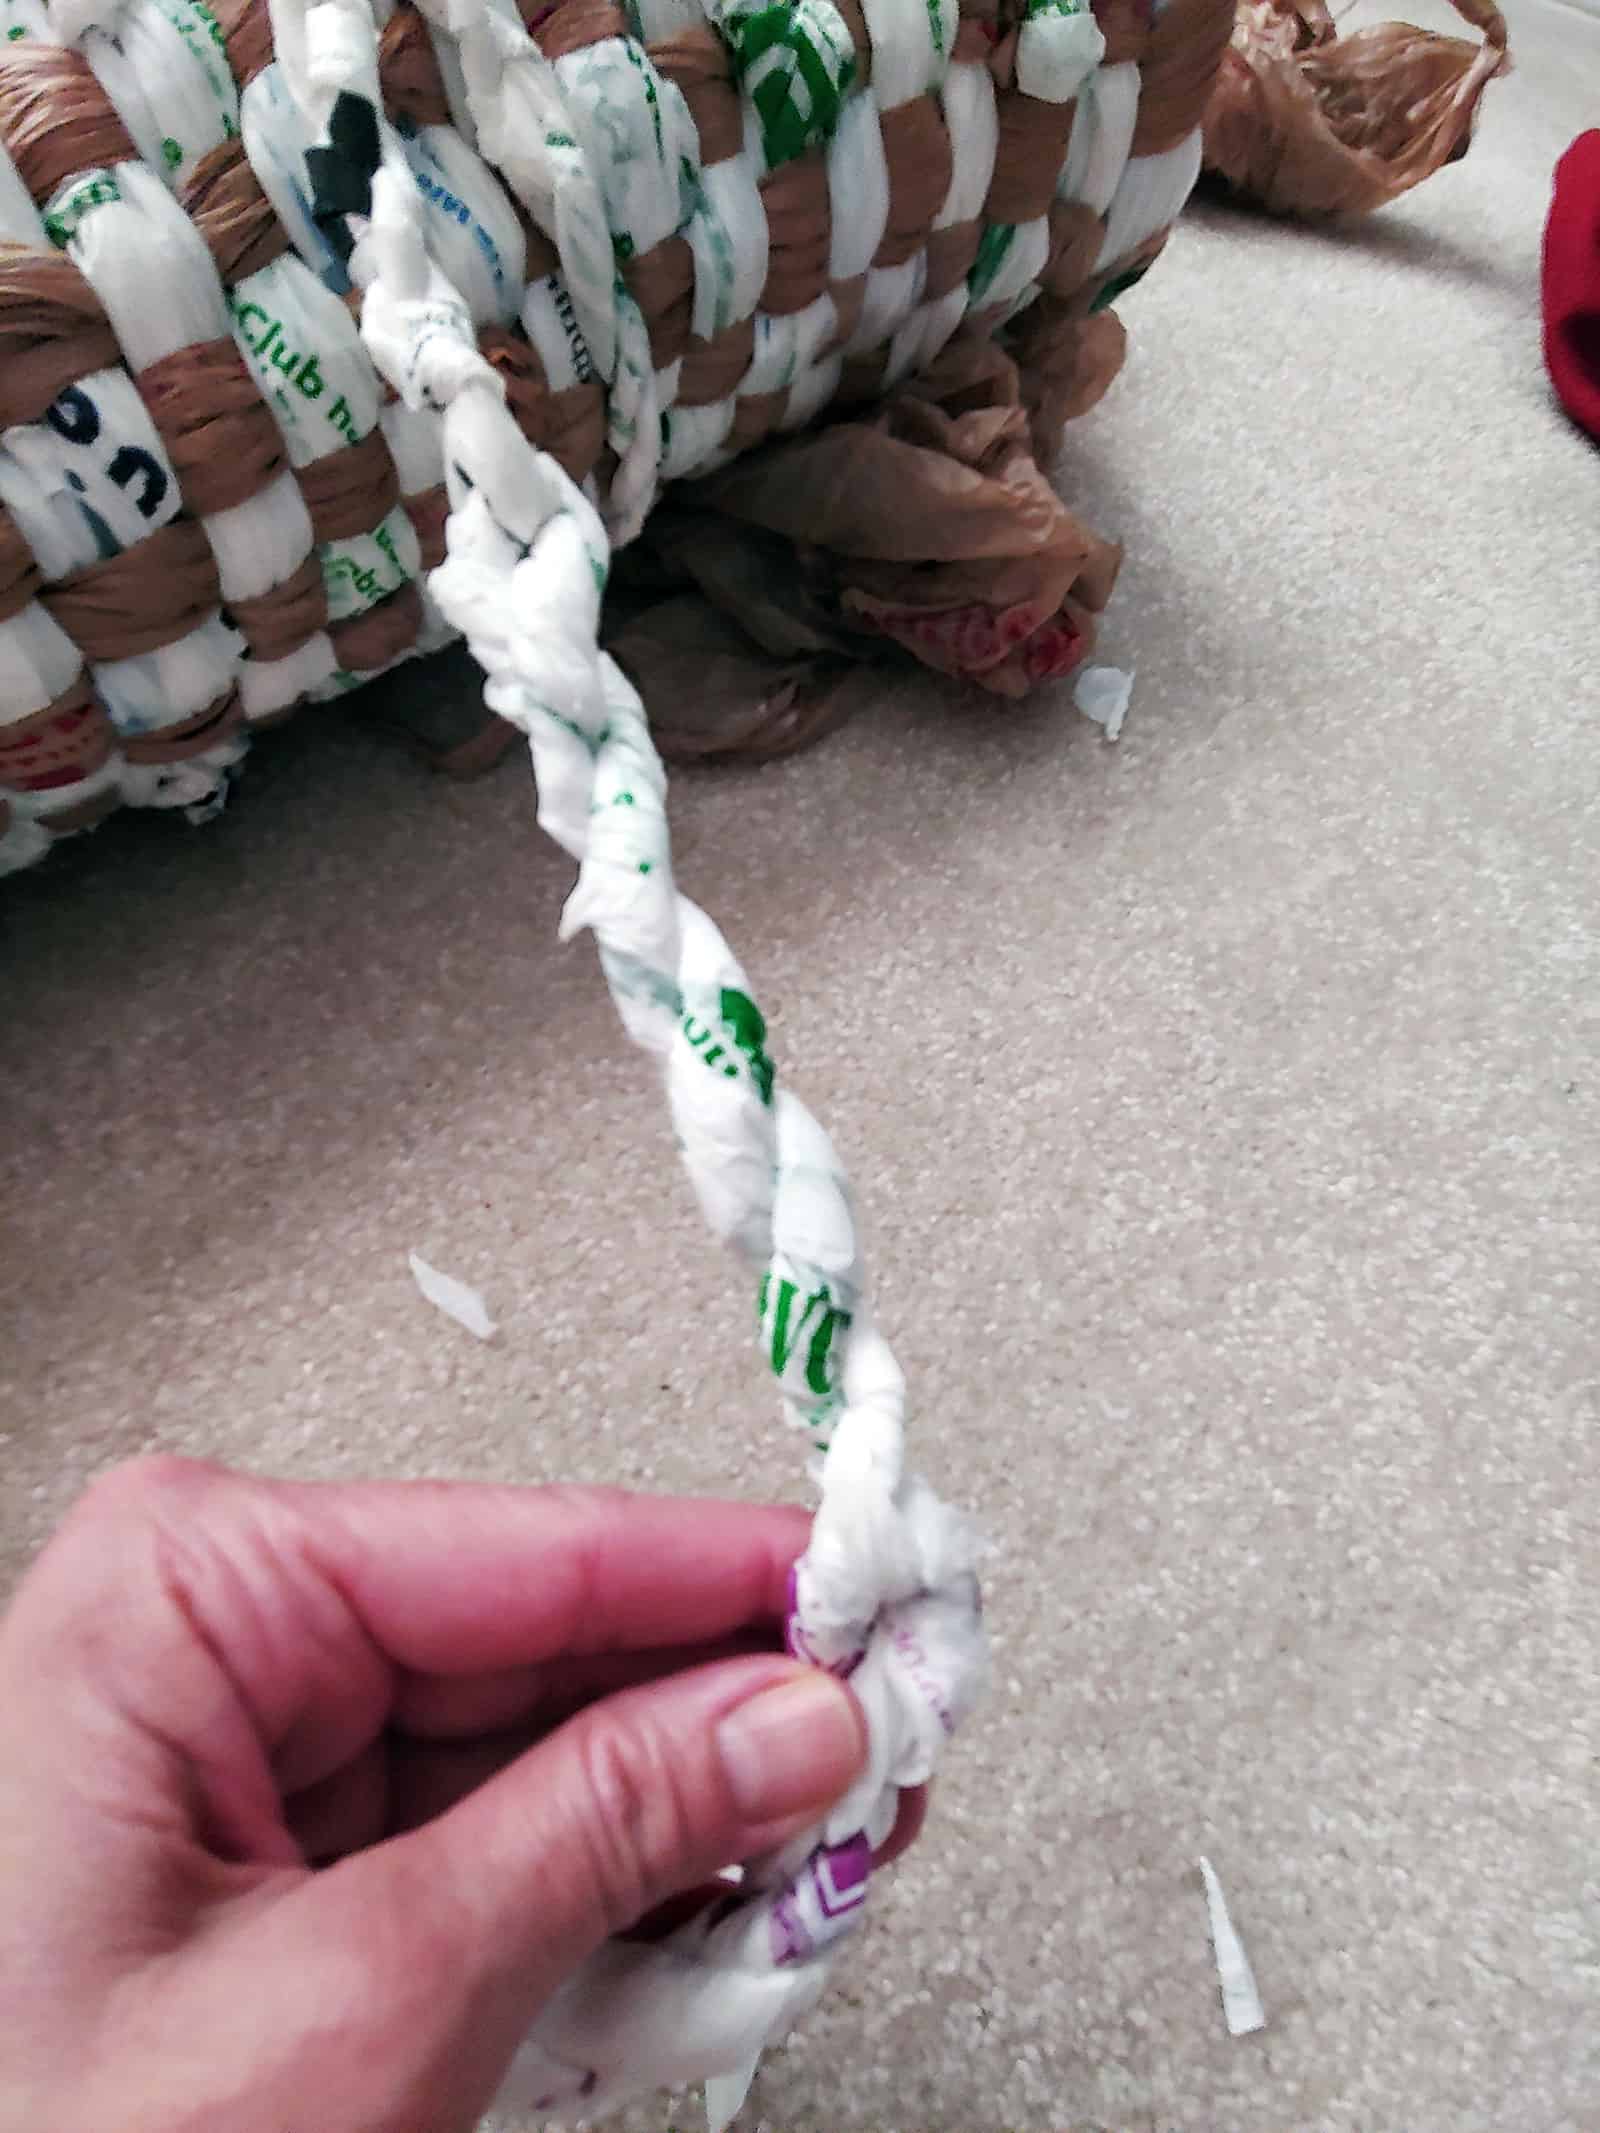
Step 6: Make a Carry Rope
To make the rope to carry the bag, we followed the video below. However, we used the same size bags that we do for the weaving so they’re thicker and stronger. Just prepare about eighteen bags like you did for the weave and then hook them together.
Picture of Our Rope
Step 7: Make a pillow
The pillow are about 20 inches wide by 12 inches tall. Any nice material will do for base, but cotton or a cotton blend will proabably be the most comfortable. When you cut it out, leave a enough room for a seam. Leave two or three inches opening. Then use the extra bag pieces you have left over from the mat and stuff them through the opening you left. Hand-stitch the opening closed. Easy peasy, even for someone like me who doesn’t sew.
Here is a PDF from the same organization who did the loading loom video above with written instructions. I didn’t find these until long after we made our mats, so ours are a bit different.
Also, make sure you stuff the corners first with the bag pieces. These will also last a long time in the outdoors.
Now Go Make Mats
That’s it! Start saving your bags from the landfills and turn them into something useful. You can contact your local homeless shelter to find a way to distribute them. Happy weaving!
If you have any tips or project you like to do, I’d love to hear about them.

Text and Photo Copyright 2020 Teyla Rachel Branton
Video Copyright by the individual creators/embedded from YouTube
Reuse notice: you are free to print 7 Steps to Making Sleeping Mats from Recycled Plastic Bags for personal use or non-commercial use with friends, share this post link anywhere, quote a short excerpt with attribution and a link to this site, but you may not use this post in its entirety on your own page. Thank you for caring about copyright.
JACQUELINE
Our class wants to create mats, but we won’t have a loom. Could you tell us another way to create a mat or pillow? The plarn steps still looks confusing?
Heather
Hi Jacqueline – I make these all the time but have never heard of using a loom before. The loom gives it a cool kind of look but I always crochet mine. I use a large, thick crochet hook & use a simple single or double stitch back & forth until I’ve made a mat. I’ve experimented making blocks & stitching them together to add variety. The thing that takes the longest is cutting up the bags & joining them together to make the plarn. Hope this idea helps!
Debra Kanner
I’m with the American legion Auxiliary unit 87 in Bullhead City,AZ. We have a large loom to make mats but no instructions on how to use it. If you can help me out the would been great. I’ll watch your videos but would like written instructions if possible.
Teyla Rachel Branton
Hi Debra. Really the best way is to watch the videos. That’s how we learned. Since moving, we no longer have a place to deliver the mats so unfortunately we had to stop making them, so to write written instructions at this point, we’d have to collect bags and remember how, lol. Hopefully we will find another outlet soon, but for now we have had to go on hiatus.
Plastic Bag Donation
Hi,
The effort here in our community has closed and is no longer taking clean plastic bag donations. Do you take plastic bag donations? Do you know of an organization we can donate our plastic bags to be used for mats?
Thank you for all you do and your time in this matter,
Jerri
Teyla Rachel Branton
Hi Jerri. My daughter and I are still making the bags (in fact, we started a new one last night), and the charity here we donate too is still accepting the mats from us. Unfortunately, we have enough bags from our family and friends at the moment–more than we can keep up with. I’m only hoping that eventually when COVID passes, places will be able to accept them. The only option I know of at this point is to put them in the recycle garbage bin or to make the mats yourself. I wish there were another way! Thank you so much for asking. Best to you!
April Lewis
Hi I am making mats for my community and now one of the schools is doing a club to make them but crocheting will be lengthy. I would like to build looms for them. Would you be willing to share your design and pictures in detail? I would greatly appreciate it
Wanda
This is awesome! Great job Lisbon and Teyla. I can see these as a great beach mat, an area rug in the mud room and so much more. It would be a great project to sell and donate the money to charity.
Bobbi Joyce
I will need my husband to build the loom for me. I could use some more specific instructions for him to follow. Where could I find those? Thanks so much!
Teyla Rachel Branton
I can take more pictures of the loom. Basically, you need it 6 feet long on the side and 2.5 feet for the sides and then some support pieces of wood. And some wooden dowels to make the pegs. We put them an inch a part. As the metal rods are 6 feet tall, you should make the loom between the two pegged sides at least at inch shorter than 6 feet, which will give you room to bend one end a tiny bit so it doesn’t com out, and have the other end stick out a little. Does he have a particular question after this? Let me know!
Elvia Courts
Would I be able to get one of these mats that has the carrying handle?
I’d be willing to pay postage for it to be sent to me.
Thank you.
Teyla Rachel Branton
In the meantime, we have moved across the US and have had to pause production for a while as we prepare to move again. I wish we could send you one!
Elvia Courts
I got your reply about moving again.
Please let me know when you are moved so I can get the sleeping mat.
Thanks for getting back to me.
Rod Wojcik
What are the instructions and supply list?
Carolyn
How wonderful! I’ll put a link on Twitter and Facebook. Keep up the good work, both of you!!!
Teyla Rachel Branton
Thank you for the shares!
Charlotte
We also make mats for the homeless but we Crochet ours; we use a large Crochet hook and a simple single Crochet. we make the bags into large balls and Crochet the mats to measure 4 foot by 6 foot. They are very comfortable. Tell Lisbon to keep up the good work.
Teyla Rachel Branton
I have heard of crocheting mats. That is so cool! Lisbon is here with me. She says she will keep it up!
Charlotte
Tell her that is good and that we are proud of here for making the mats.
Teyla Rachel Branton
Thank you. I’ll tell her! 🙂
Jesse
I would like a mat can pay postage or even pay a little for the mat
SARAH TAYLOR
These mats are amazing Teyla and Lisbon way to go I would sleep on one of these mats Great job and Thank you for sharing with us ! Blessings To You and Yours ! You guys Rock
Teyla Rachel Branton
Thank you so much. We are having fun!
Evelyn
What a great project to make a difference. Amazing young lady!
Teyla Rachel Branton
Thank you so much!
Louise Pledge
My ward RS has made thousands of these for the homeless, but my only part was to collect bags. I love seeing the process, as well as the finished project!
Teyla Rachel Branton
That is so cool! Yay! Glad we could post a few videos!
Joyce Cline
Such a wonderful idea. Thank you so much that your family cares enough to do so. I am going to look into making these in my area.
Teyla Rachel Branton
That’s great! It’s a lot of fun, and something to do when during the social distancing, lol!
Teyla Rachel Branton
Thank you for the shares, and I’ll tell her! 🙂
Sandy
I would be proud to sleep on one of these mats. I can see the quality work that goes into them. Great job Lisbon! I like your dedication and loyalty and your empathy for the homeless. God bless you ❤️
Teyla Rachel Branton
Lisbon says thank you! Her goal is to make them soft to sleep on.