
Most professionally published Kindle ebooks open on Chapter One or the Prologue, yet many people who use Calibre to covert their html files to Mobi don’t know how to make this happen. So here’s the secret to getting that Kindle ebook to open right where you want it to. This is assuming you took your book from Word saved to a Web Page Filtered HTML file. I was given this information by ePubMasters, who are masters at formatting ebooks (their site isn’t up yet, but should be soon), and it is reprinted here with permission. They even helped me clean up my HTML documents so I could load them myself to the very picky iBookstore.
(Update 2015: Both ePubmasters and I have both switched to using Jutoh now to format books.)
And just for the record, at this writing, there doesn’t seem to be a way to make epub files open at a particular spot.
First, open Calibre and choose Add Books. Find the HTML file you want to add and click on it. Once book is added, right click on the book and select Open Containing Folder.

Windows Explorer will open to the book location:
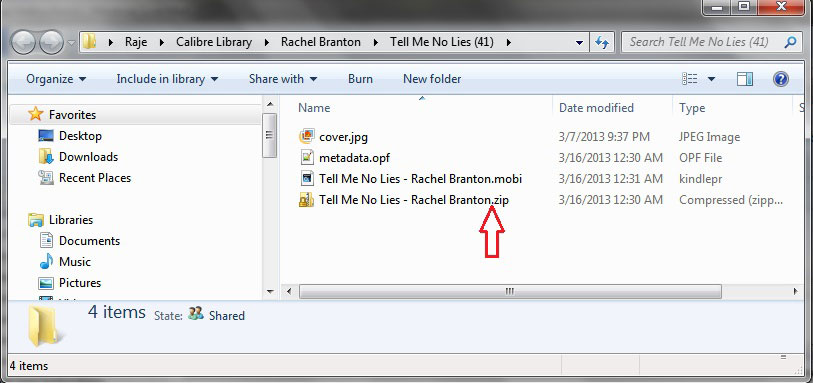
The <book name – author>.zip file contains your original HTML file together with the OPF file generated by Calibre when it imported the book. You need to edit the OPF file to get the “Start” location for the book to work correctly.
At this point you need a program that can open zip files and that will allow you to edit the files directly. Windows Explorer will let you open the archive (zip file) and will even let you open the files within the archive, but will not allow you to change them.
I like 7-Zip for this. Its free. Others will work (for example, WinZip).
Double-click the zip file, that causes 7-Zip to open it (if it opens in Windows Explorer, go back, right click the file, and choose 7-Zip from the popup menu).
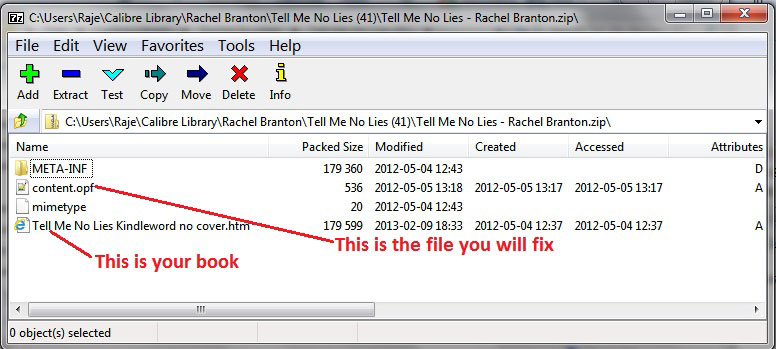
Double-click the “contents.opf” file. If this is your first time opening a OPF file, your computer will ask you what program to use. Select Notepad++ if you have it, otherwise just select the standard Notepad (do not use Word or other word processing programs to edit this file). Look for </guide> towards the end of the document.
<?xml version=’1.0′ encoding=’utf-8′?>
<package xmlns=”http://www.idpf.org/2007/opf” version=”2.0″ unique-identifier=”uuid_id”>
<opf:metadata xmlns:xsi=”http://www.w3.org/2001/XMLSchema-instance” xmlns:opf=”http://www.idpf.org/2007/opf” xmlns:dcterms=”http://purl.org/dc/terms/” xmlns:calibre=”http://calibre.kovidgoyal.net/2009/metadata” xmlns:dc=”http://purl.org/dc/elements/1.1/“>
<opf:meta name=”calibre:timestamp” content=”2012-05-04T18:43:19.415000+00:00″/>
<dc:identifier id=”uuid_id” opf:scheme=”uuid”>4994d324-de3e-4545-9211-bcdda15cbfeb</dc:identifier>
<dc:creator>Unknown</dc:creator>
<dc:language>en</dc:language>
<dc:title>Tell Me No Lies Kindleword no cover</dc:title>
</opf:metadata>
<manifest>
<item href=”Tell Me No Lies Kindleword no cover.htm” id=”html” media-type=”application/xhtml+xml”/>
<item href=”toc.ncx” media-type=”application/x-dtbncx+xml” id=”ncx”/>
</manifest>
<spine toc=”ncx”>
<itemref idref=”html”/>
</spine><guide/></package>
<guide>
<reference type=”text” title=”Start” href=”Tell Me No Lies Kindleword no cover.htm#one” />
</guide>
Notice that the HREF attribute has two components: to the left of the # is the file name, and to the right is the anchor that you would have used in the TOC.
The file name is the name of the file as it sits in the ZIP file. Look at the screen shot above, where the line points to “this is your book.”
Look for where you put the “start” tag in your book. The anchor name right below it is what you would use to the right of the #. So, for Tell Me No Lies, its “one” since the start tag is right above the anchor for chapter one.
Here is an excerpt from the html file showing the start tag and the chapter one anchor right below it.
<div id=”start”> </div>
<p> <a name=”one“></a></p>
<guide>
<reference type=”text” title=”Start” href=”Tell Me No Lies Kindleword no cover.htm#prologue” />
</guide>
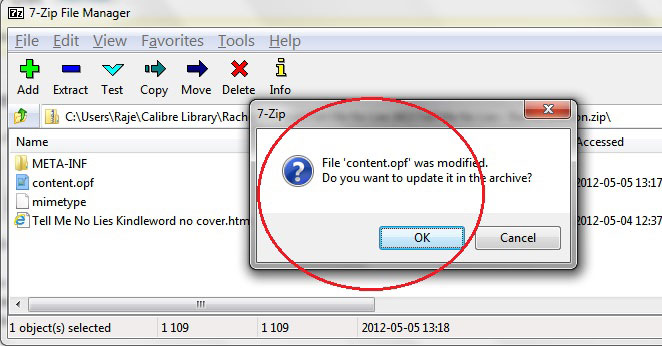
Now close 7-Zip and go back to Calibre.
If you have not yet added the metatags, do it now. Once that is done, you can convert the book from ZIP to Mobi. (You can also convert the same file to Epub, though the start will not work for that file.)
You can again right-click the book and select “Open containing folder.” The converted files will be there, ready for upload.
Need to make changes to your file?
If you find errors in your book, or if you need to make other changes to your HTML file, there is no need to redo any of these steps or to imput the metadata again IF you open the Containing Folder again, click on the ZIP file, and drag or paste in your newly updated HTML document. MAKE SURE THE NEW HTML FILE HAS THE SAME EXACT FILE NAME. THAT MUST REMAIN THE SAME. IF YOU CHANGED IT, YOU WILL HAVE TO REDO EVERYTHING. The program will ask if you want to replace the current HTML. Click yes, close the window and then covert book as normal. Your newly updated file will be converted.
Happy ebook converting!
![]()
Copyright 2013 Teyla Rachel Branton
Reuse notice: you are free to print for personal use or non-commercial use with friends, share this post link anywhere, quote a short excerpt with attribution and a link to this site, but you may not use this post in its entirety on your own page. Thank you for caring about copyright.
How to make your book into a mobi for Amazon | A Writer and her Blog...
[…] INSTRUCTIONS: Okay, the document, “Rapunzel, html to practice on” will be the file that you will turn into an ebook. In the document, “DETAILED INSTRUCTIONS on how to make this into an HTML,” I will show you how to take the document, “Rapunzel, html to practice on” from Microsoft Word to a Web Page Filtered file where we’ll work on the html with notepad and internet explorer. (NOTE: I’ve already cleaned up the document– I STILL provided instructions on how to clean your file when the time comes to turn your own novel into your own ebook). THE instructions that I provided will tell you how we take it from its web page filtered file to Calibre, and then make it into an ebook and test the mobi on kindle previewer and test the epub on the Adobe Digital Editions. The document, “Simple instructions html” make things super easy in a step-by-step approach, but if you’d like more detail (especially with cleaning up your document, etc.), see DETAILED INSTRUCTIONS. And finally, the document “Kindle html codes for Stephanie” are html hot codes that my friend sent me that have been really REALLY helpful with formatting my Twisted Tales Series. So, on that note, take a go at it! And the best of luck to you! I hope this will streamline the process! And let me know if any thing is cloudy and I’ll try to make it more understandable. Also, for a SUPERIOR and detailed Calibre/Start Tag tutorial. See Teyla’s site (I highly recommend this site, she’s a great author and smart too boot): HERE […]